Showing posts with label sweater. Show all posts

Wednesday, February 27, 2013

Things are getting fuzzy!

Knit Picks Galileo in "Gem" on size 3 (3.25 mm)
Spinning and swatching have taken up my fiber time lately.  I've been working on wooly goodness to put into my Etsy shop as well as spinning more singles for another embellished yarn.  Swatching for some new projects as well.  Sometimes it is nice to start looking into my next few projects when I feel ready to stall out on my current one.  Shipwreck is in that particular spot right now... a little too much time on really fine yarn and fiddly lace has me hungry for some super simple take along type of projects.  That being said, naturally the first thing that grabbed me was the extra-super-duper fiddly cabled cardigan called Tapestry.  I'm nuts - I know.  But the swatch was plain stockinette with garter borders, so it met the need of super easy knitting that I needed just then.  Of course the photo also gives me away - I've cast on for the sweater and I'm a couple rows into it.  Didn't I just frog out a cabled sweater?  Ummmmm..... yes, but I guess I'm ready for more punishment on even finer yarn and smaller needles.  Learning from recent mistakes doesn't always happen in my case evidently.

Combed Romney nests up for sale
Other fiber madness includes this batch of delightful fluff.  This is hand combed Romney that I processed on my English 4 pitch combs.  I mentioned them and discussed the process back in the Wicked post.  It is a very nice way to get lovely spinning fiber out of clean but trashy (with VM) fleece.  Spinning from hand combed top is such a pleasure.  The fiber is arranged in parallel fashion, so the spining is so smooth and wonderful!  I like texture too, but nothing beats combed fiber for a lovely smooth singles when spinning.  This Romney is pretty typical of the breed, long and silky fiber.  Not as harsh as most of the longwools and a terrific fiber on which to learn spinning.  There is also something about spinning the pure, undyed, creamy natural wool.  My passion for color in spinning doesn't often give me the time to do much white, but this fiber may just find a place in the lineup sometime very soon.  This particular batch is listed here in my Etsy shop.  I'm working on more of this fleece in dyed colors as well.  Those will go up in the shop as soon as I'm finished combing them.

Original pair of swatches for Knit, Swirl jacket
Another fun project that I'm still swatching is a jacket from the book Knit, Swirl by Sandra McIver.  I've wanted to do one of these lovely knitted works of art for several years, so I finally bought the book and raided my stash for these swatches.

The rich purple is a mohair that has been in my stash for years, just waiting for the right project to showcase it's beauty.  Being mohair, it isn't next to the skin soft, but it has such a wonderful fluffy halo that it should work well in this jacket.  The one on the bottom is the handspun that has made several appearances in this blog.  It is the Dolly Dorset with Louet Northern Lights in Wild Berry Jam.  These swatches were done on the same needles with the same stitch count and pattern, and they don't match up for size.  Bummer, but that is why I do swatches, to find this kind of thing out before I charge into a project.  I've learned this the hard way... so I do a lot more swatching than I used to.  Since the tags aren't really visable, I'll give the details here.

The mohair swatch is done in Millie Mohair that I've had in my stash since 1992 or so.  I remember buying it back when I lived in Colorado from a shop called the Recycled Lamb.  I believe that they are still in operation - I've encountered them on Ravelry from time to time. 

Back to the swatch: I cast on 24 stitches with the plan of a three stitch garter border and worked it up on size 7 (4.5 mm) needles.  Did four rows of garter stitch and then worked the stockinette center section and finished up with another four rows of garter stitch.  Bound it off and gave it a bath.  Who knew such fine yarn would work up in nearly Aran weight?  The fabric is light and airy, but the fuzz really fills it up!  I also notice that it has a definite tendency to bias which is good to know.  I didn't block it hard because I wanted to know what it wanted to do on its own.  Worked up at four stitches per inch, just a bit too big for the gauge called for in the pattern.

The second swatch is the handspun done up in the same fashion.  But it washed up nice and square - being a three ply yarn really helps it to behave as a more stable yarn construction.  This swatch worked up at just over five stitches per inch. 

New swatch showing the welted construction,
done in two different needle sizes
Tough decisions now... do I switch yarns, or switch needles to make these yarns work together?  The first thing I sampled was to change needle sizes to make the gauge match and it worked pretty well.  But, and here's the big problem, I don't like it as much.  Knitting the mohair on size six (4 mm) needles makes it firmer than I really want and really compresses the fluffy fun that makes the yarn such a treat.  I also find that I'm not as wild about the handspun on the size 8 (5 mm) needles.  A bit too floppy for my taste, and I think the colors just don't really go together as well as I'd hoped.  So, I'm back to the drawing board.  What I'm considering now is a very plain yarn with the mohair so there is less competition between the yarns.  I'm also thinking that I may alternate rows to spread out the fluff a bit.  The welts will still show up well I think, but I'll need to swatch it to be sure.  I'm not wild about the visible purl bumps between the welts, so I may match up the yarn on those rows to help them blend in better.  So, now I'm in search of a new background yarn to use with the mohair.

Thursday, January 3, 2013

Welcome to the frog pond... are you hungry?

Discovered this in my inbox this morning and thought it made a certain amount of sense, so I'll share it with you too.  It is a little video (under two minutes) that really made me think about what my own "frogs" are.

http://www.flickspire.com/m/AdvancedLi255/EatThatFrog

So here's my first live frog... a frogging project!  I've decided to "frog" the cabled sweater so it will stop bothering me.  In case you aren't a knitter, "frogging" is where you discover a mistake a few rows back, and "rip-it, rip-it, rip-it" back so it can be re-knit.  Hopefully correctly on the second try.  Some projects take many trips to the frog pond.  I had a sweater that I had completely finished knitting the pieces and frogged it all the way back because I didn't like the fit.  I blogged about that here, just scroll down the page until you see the red-violet sweater.

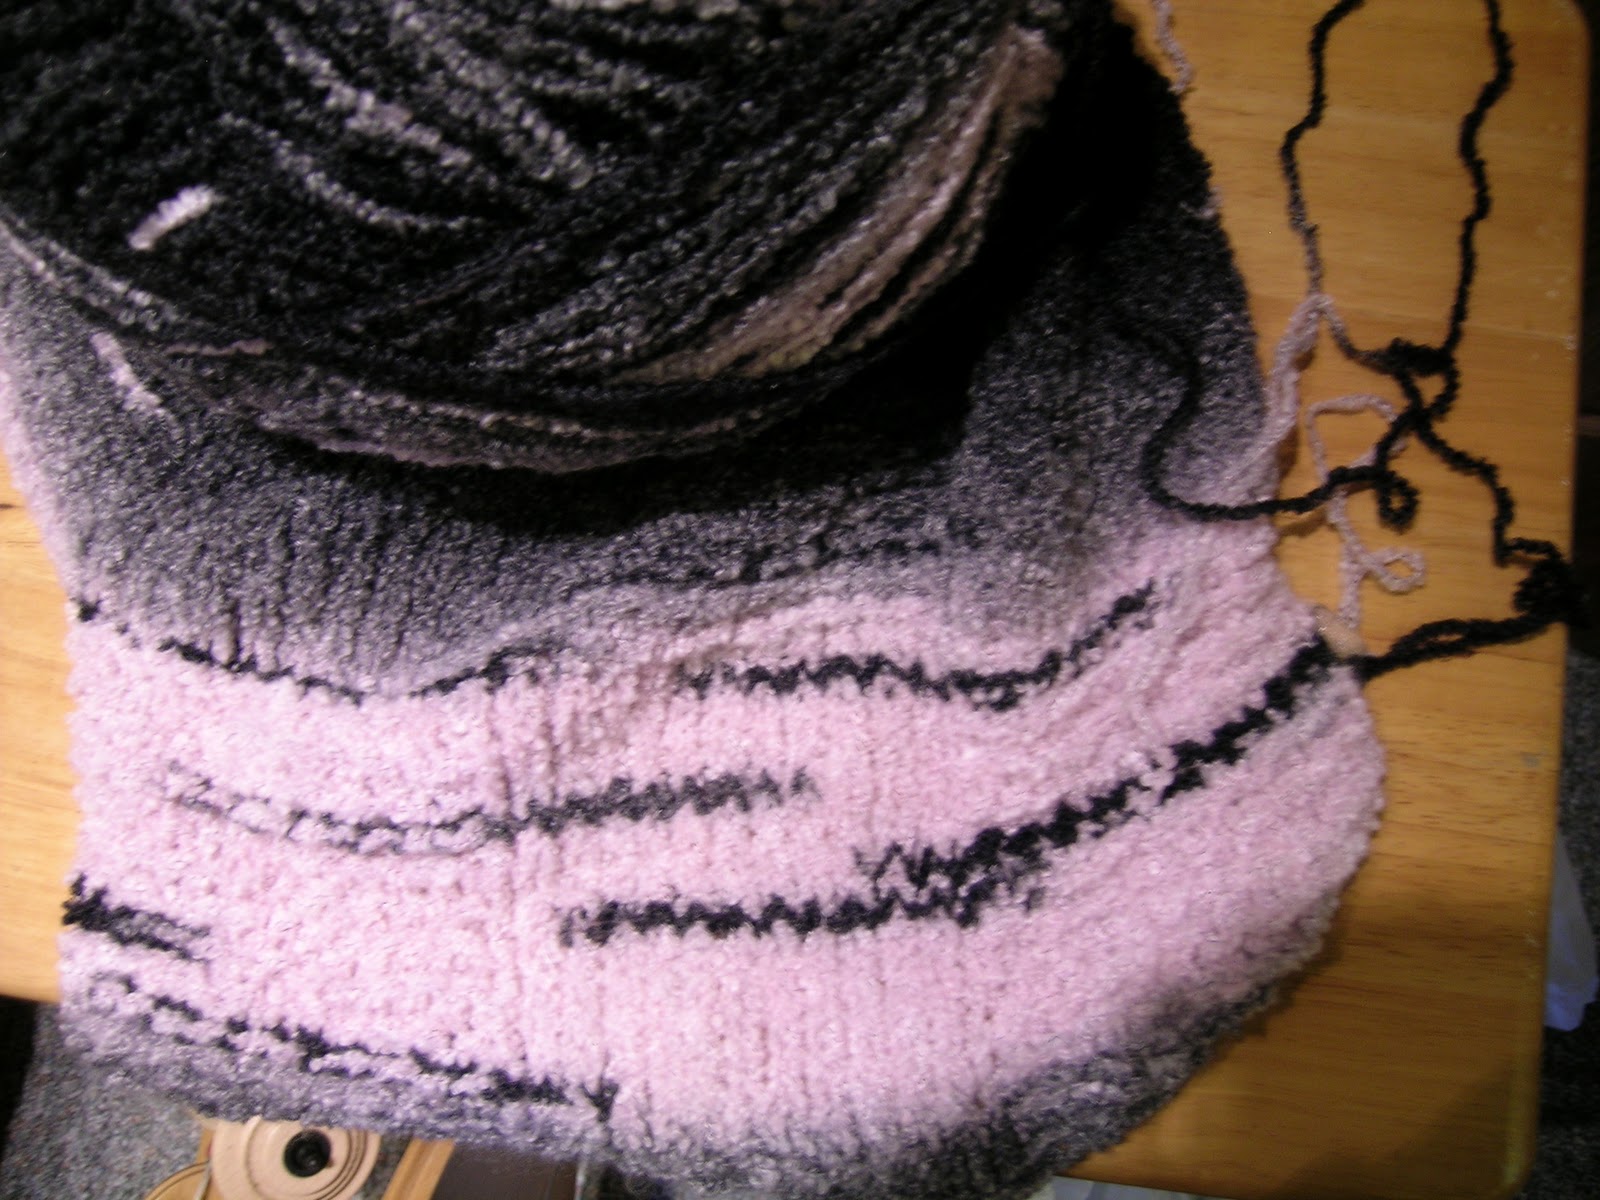
See how the ribs mis-match the cables... bummer!
So here is the shot of the mistake side of the sweater... I showed you the good side last post.  See how the cables don't line up with the ribbing.  That was making me unhappy, because that is one of the things I really liked about the pattern.  Since I hadn't done cables in a while, I followed the pattern precisely rather than making sure it made sense on the reality of the needles.  When I converted the pattern to knitting in the round the stitch count didn't line up to the pattern anymore - probably because of the stitches not being lost into seamlines of the finished sweater.  In any event, I'll reknit this in the round and watch more carefully to be certain that the ribs line up with the cables.

This is the part that always makes me go "hmmmmm....." because as satisfying as it is to watch a mistake disappear, there is the niggling consternation over how long it takes to knit this amount of yarn versus how quickly it can be made back into just balls of yarn again.  In any event, it is finished now and I can consider how to start again to make the ribbing line up.


Back to being balls of yarn, needles and a pile of markers.
Part of the reason for the error is that I hadn't done cables in such a long time that I didn't really watch where the stitches of the cable were coming up on the pattern over the ribs.  I was too busy counting stitches!  It is going to be a matter of lining up the knit stitches of the cable pattern over the knit stitches of the ribbing.  Sounds easy enough, but there are several charts working at the same time - six different charts in each row.  I've made myself a "cheat sheet" of sorts where I've made photocopies of the charts, which are different sizes, and I keep a colored pencil with me so that I can mark off the rows as I finish them.  Ponderous, I know, but it is a way to keep track that works for me.  There are chart keeping systems out there that use magnets to line up on the papers, but I don't have one of them.  Since I keep my pattern on a clipboard that goes in and out of a project bag, I'm not sure the magnets would stay in place.


Brindle Shetland roving and bobbin of singles in process.
The next thing I've been working on is the Shetland roving I started on the last post.  I've got over half of it finished now.  2.6 ounces of the 4 ounces I started with are now spun into singles.  This is such luscious wool - I'm loving the way it spins up, fine and soft and very different from the commercial Shetland yarn I've encountered in yarn shops.  I spent some time with my Mom today and since she remembers the days when Shetland sweaters were all the rage, I asked her about them.  Wondering if maybe the wool was better back then, like the hand processed roving I'm using now.  She said it was dreadfully scratchy to wear those sweaters, and she had to be sure to wear some kind of firmly woven shirt underneath those stylish sweaters!  What young women go through to be fashionable.... seems that it never changes. 

I take a certain comfort in knowing that as a spinner, I really can do a lot to make my yarn be exactly what I want it to be.  Granted, there are some wools that really are never going to be "next to the skin" soft.  There are many others that can either be blended with other kinds of fiber, or handled more gently in processing that will come very close to being that soft.  Soapbox I'm hauling out now: the medium wools may not be as soft as the finewools, but they are lots more pleasant to spin, more durable, and by buying raw fleeces or roving from local shepherds I get to support small, local farms.  That is so important to me... having had a farm of my own for ten years.  The driving force behind this rare breed spin-a-long is to encourage spinners to at least try some fiber that is new to them.  I can use myself as an example of how surprising the project can be.  I would cheerfully buy more of this kind of roving from this farm.  Shetland sheep have a claim to fame in their colored wool - there are eleven "official" colors and many patterns of markings on these tiny sheep.
The worn heel of my favorite slippers.
Garter stitch patches, about 4 inches square.
Next thing I've been working on is some mending.  I'd prefer to mend than to remake things as much as possible... use it up, wear it out, make it do, or do without is something of a mantra for me.  Not a popular idea in current culture, but one that I strive to live.  This particular mending project is a pair of slippers that I knit and felted about a year ago.  I've loved them nearly to death, and now they need patching.  These slippers are from a felting book that I just love.  There are many projects that I want to try, but I've done these twice.  When I do mending, I try to catch spots that are wearing thin before they become holes - which are much harder to fix!  I decided since the rest of the soles of the slippers are in pretty good shape, I'd just patch the heels.  My thinking was that since the stockinette wore out faster on the heels, I'd do the patch in garter stitch to get more yarn into the same amount of space.  I knit up a couple of squares of garter stitch, casting on 20 stitches on size 8 needles and working until the pieces were square.  The next step is to felt the squares.  I'll put them into a "delicates" bag and throw them into a heavy duty wash with low water level and plenty of soap - with a couple pairs of old jeans for company - and beat the fuzz out of them until they become good, firm felt.  Having done some of this kind of felting before, I'm pretty sure they won't be square at the end of the process, but since it will be felted, I could cut them to a specific size if I wanted. 

My favorite, although well worn, slippers.
Here is my project page from Ravelry on these slippers.  And here is a shot of what they look like today.  The soles are in pretty good shape, but the superwash sock yarn tops are still like new.  Superwash wool is amazing stuff!  This is done in Wildfoote from Brown Sheep yarn company.  Still available, but I don't know if this colorway is still part of their line up.  I bought this yarn years ago, and did a stash dive to make these slippers over a year ago.  I've been so impressed by the durability of these slippers and I've made another pair since then so I can always have a pair to wear - they take a couple days to dry after being washed - felt is pretty dense stuff!  The felt does relax a bit with wear, so washing and doing a little massage job on the worn parts tightens the felt a bit, but these are to the point that the felt doesn't have the ability to tighten up enough anymore.

My condo is on a slab foundation, and the thickness of these slipper soles keeps the chill off my feet very well indeed.  I'm off to make felt patches....


Tuesday, January 1, 2013

Happy New Year!

Shetland Wool - Brindle roving from Bramble Wool Farm
This blend is 49% Black/51% White Shetland in natural colors.
So begins another adventure!  Since I work third shift, I was awake for the midnight change of year.  I celebrated by spending the night spinning some lovely Shetland Brindle roving from Bramble Wool Farm.  It is part of a Rare Breeds Spin-a-long with Joanna and the folks over at the Knit Spin Farm podcast.  This wonderfully prepared roving followed me home from the 2012 Wisconsin Sheep and Wool Festival back in September.  I had a hankering to experiment with Shetland wool, but the tiny skeins I found for very high prices at my local yarn shop certainly put a damper on my enthusiasm!  That being said, there are wonderful rainbows of color available in those gorgeous Jamieson yarns!  Since this wool is so often used for Fair Isle knitting, I suppose that it makes a certain amount of sense to have small skeins available.  I think I'll chain ply the singles I'm spinning and perhaps dye it in several colors to play around with some Fair Isle.  Here's what I have done so far:
1.8 ounces spun into singles on the Kromski, pretty fine singles
This will probably be a chain plied yarn.  I prefer the rounder cross-section of three strands to the flat nature of two-ply yarns even though the two-ply is what is traditionally used for Fair Isle work.  I have four ounces of this roving, so I'm just about halfway through it already.

Some things were surprising as I spun this Shetland.  I was sure it would feel very scratchy and rough like the commercial yarn I saw at the shop.  To my delight, it is softer than expected and it drafts well.  As I browsed the farm's website, I did discover that they hand wash their fiber, which may account for the softness and the very slightly "oiled" feel of the roving while I draft it.  Hand washing the wool allows it to retain just a touch of the natural oils to remain in the strands of the wool.  It is a matter of opinion whether this is a good thing or not - but I prefer it for spinning, since it allows the fibers to slide along each other more smoothly.  Commercial preparation strips out all the natural oils and, to me, makes the fiber seem parched and dry.  It also straightens most of the wave and crimp in the fibers which deadens the bounce and lively nature of hand processed wools.

As I mentioned in my last post, I have started the Shipwreck shawl and I'm thrilled with the way it is turning out.  Here is the first "in progress" shot I took at the end of the 5th section, called Bleeding heart lace, of the pattern. It is pinned out on a blocking mat for the picture, since knitted lace is less than lovely just sitting on the needles.  This measured about ten inches in diameter when pinned out.

I have continued into the next section, called Madeira, and shot another picture after stringing a very long cable through the stitches.  You might notice a white thread strung through the stitches a few rounds from the edge.  This is called a "life line" and is a clever way of retaining sanity while working complex lace patterns.  Lace is difficult to rip back in the event of a mistake since the holes cross the boundaries of the rows.  Life lines are threaded through the stitches of a round, and make it possible to replace the knitting needle correctly in the round if the knitting has to be ripped back.  The needles I'm using have a nifty way to accomplish this.  There is a small hole in the end of each cable connection to tighten the interchangeable needle tips - this is also useful to make life lines, just string some sewing thread through the hole at the beginning of the round.  This draws a thread through each stitch in the round.  At the end of the round, the life line is placed - much easier than other ways!  The only trouble is that it also takes the thread through all my markers.... This time, I did slip the thread out of the markers, but I think next time I'll just do another life line about five rounds later and leave the thread in the markers.  In any event, here is a picture three rounds into the Madeira pattern.
Notice that in just a few rounds the size has increased enough that it takes four of the mats to pin it out into round now!  Probably about eighteen inches in diameter now.  This style of shawl construction is called "Pi shaping" since the increases come at intervals where the stitch count doubles in a single round.  Makes it simple to keep track of the increases.

The other project, the cabled sweater, is in time out at the moment.  I've made an error when I converted the pattern to knitting in the round that altered the stitch count and the cables didn't line up exactly as I had hoped.  I'm not sure anyone would notice but me, yet part of the appeal of the sweater pattern was that the cables grew up out of the ribbing.  So I'm trying to decide if it bothers me enough to pull it out and fix it.  I'm about twenty rounds into the pattern, and it is gorgeous, but the mistake at the edge is pulling at me.  I'll probably frog it back to the ribbing and re-knit it unless someone has a slick solution to fix it without having to pull out all that work.  In any event, here is a picture of the sweater so far.
I don't see the mistake in this shot, so it is probably on the other side.  So in the interest of full disclosure, imagine the pattern offset by two stitches so the cables don't line up over the ribs at the bottom edge.  One of the many things I really like about this pattern is that the sides of the sweater are in regular stockinette stitch as well as the panels between the cable sections.  I find that more appealing than the reverse stockinette that most cabled sweaters have as the background.  Reverse stockinette means lots of purling, but it also means a nubby surface that seems more likely to pill than the smoother stockinette surface.  This particular yarn is the rugged Wool of the Andes Worsted in Amethyst Heather from Knit Picks.

Wednesday, February 1, 2012

Rrrrrrufffles!

Well, the ruffle yarn arrived in yesterday's mail.  Couldn't help myself - I started in on one of the scarf patterns right away to try it out.  This is some weird construction... here's a picture of the way this stuff is put together:
This one is called Frill Seeker Stargazer.  It has some metallic shot through it as well.  Pretty hot pink/burgundy/black progression through the colors.  The metallic is red, but it really looks nice in this combination.  I checked out some YouTube videos about how to knit with this kind of yarn.  Basically, you just use the top edge for the stitches, working with the tiny chain between the blocks to make the stitches.  I did this on size 10 needles (6mm) and a cable - this stuff is slick and slides around a lot! 


Here's a shot of the whole skein before I got started on the scarf itself.  It was loosely tied in 3 places, and it said right in the pattern NOT to wind it into a ball, so I put it on an umbrella swift and started knitting.  Very simple pattern, just 12 stitches in garter stitch until you run out of yarn, or get to the length you like.  Mine turned out 50 inches long, and it is much softer than I expected it to be with all that metallic in it.  The fiber content on this Stargazer yarn is 78% Acrylic and 22% Polyester.  Since it doesn't mention the metallic, I'm assuming that the polyester is the metallic carrier somehow.  The ruffling happens automatically - the chain knits into a scaffold of sorts to hold the gathers in place for ruffles to happen on the outer edge... like this:
Soooooo, after the last of the skein comes off the umbrella swift and over the needles I ended up with a very pretty scarf to wear with my raspberry colored winter coat.  One thing I did notice with this yarn is that it snags pretty easily - especially the metallic thread.  So this isn't going to be something that will work with any coat with Velcro closures near the neckline.

This is a hand wash and dry flat kind of scarf, but being all synthetic, it won't take long to dry.  Keep it from snagging up - wear gloves when washing it so it doesn't catch on anything.  It seems to be very soft and should be quite warm - of course it is also highly unusual and decorative!  Pretty as an accent scarf for a plain dress or turtleneck too.

I don't think I've ever done a project that worked up this fast - and fun to watch it do it's thing!  So I already have a finished scarf!  Ta-daaaaa!


Next thing I finished up was the sweater.  I decided to "line" the button bands with ribbon for stability since the knitting was somewhat soft and there really wasn't much to attach a button to that would hold it up without sagging or pulling the stitches out of shape.  I spent some time in the library, dug out the old standard Vogue Sewing book and read about couture methods on buttons and buttonholes and came up with an idea that worked out well.  I wasn't able to find ribbon that exactly matched the red-violet color.  This didn't really surprise me, it isn't a common color.  So I used a satin ribbon printed with a Victorian style pattern in black and white.  I hand sewed it in place on both button bands so they would be firm and straight.  Then I cut small slits in the ribbon and did hand worked buttonholes, using buttonhole stitches (basically the same as a blanket stitch, worked tightly and very close together) and I got very stable, firm buttonholes.  I tested the fit of the buttons several times as I worked the buttonholes, since I wanted them snug, but not too tight.  Here's a picture of the buttonholes:
The stitches are pulled quite tight, that keeps the row of edge stitches in place and centered on the edge of the hole itself.  Interestingly enough, I found that I had a better result by starting in the middle of the long vertical of the slit rather than on one of the ends.  I'm not sure why, but that's how it worked out for me.  Here's a picture of the ribbon bands - granted, this is the inside of the sweater - the stitches aren't perfectly even, but they look okay to me.  Since I'm the only one who will really ever see this part, I didn't tear it out to make it perfect on the inside.  I'm recovering from generations of perfectionism... so I'm calling this a good thing! 

Interestingly enough, I've never seen this method of handling button bands except on an old sweater that my Grandmother made for my Mom - she did machine buttonholes over grosgrain ribbon.  I wanted mine done in yarn, so this is what I came up with.  Never have done a cardigan before, and even though this one took two tries to complete, it is done and I'm pleased with it.  Finally, finished and blocked, here is the last picture of the finished button bands.


Yep, my first ever cardigan.  I like it.  A lot!

Thursday, October 20, 2011

Time marches on...

I've been busy with a number of things, since I haven't posted much lately, I'll just put them all out here now.

Here is some yarn I've been working on:

It is another three ply with one variegated ply along with two tweed plies.  The variegated ply is from Frene Creek Farm and is a lovely handpainted Corriedale in purples all the way to lavender in some spots.  The tweed plies are 75% natural gray Rambouillet Finn crossbred with 25% bright purple merino blended in to get the purple tone.  I tried a sample of this using just the gray and it didn't read as purple as I wanted it, so I referred back to my color study to figure out how much I wanted to tint my colored wool for it to "read" visually as purple but not overpower the variegated ply.  I'm pleased with the way it turned out.
Here's a close-up shot of the same skein:
I'm extra glad that I put in the effort to do the color study.  The visual usefulness of such a project has already proven the worth of doing it.  I did do a small sample skein using the gray, and it didn't "read" as purple at all!  I saw it as gray and black, and I knew that wouldn't work for what I have in mind for this yarn.  Here are the vital statistics of this skein:
258 yards of 3 ply.  One ply Frene Creek Farm Handpainted Corriedale roving, two plies of natural gray Rambouillet Finn crossbred blended with 25% bright purple merino and carded four times to blend the colors.  I think this will work up at about fingering weight, it is finer than my typical yarn since the R/F is pretty soft.

Next up: the reworking of the red-violet sweater.

About two sizes smaller and doesn't it look nice?  Granted, it isn't assembled or blocked yet, so the stitches will even out and be smoother after blocking.  I used the ravelled yarn to reknit, so it looks "bumpier" than the first knitting did.  I'm working on the raglan sleeves now, and I'm doing those flat, rather than in the round like I did the body of the sweater.  I'm pondering what kind of buttons I'd like on this.  Picking up for the button band and collar are the last things to do on the sweater, so I do still have some time.  Surprisingly enough, even though this is an odd and somewhat bright color to most people, I'm finding that it goes with a lot of my wardrobe.  So I'm thinking the buttons can't be too bold.  I've heard of an outfit called "Moving Mud" that makes custom glass buttons, but I don't know what they cost.  That might be the next good investigation to make on the button issue.  I've also got 3 very good knitting shops close by, so I think I'll check out their offerings first.  Here is a picture of the front of the sweater:
I've learned a lot making this sweater - especially since I've gone down the path twice. I definitely preferred doing the body of the sweater in the round.  All the bands match up and the armhole is better supported during the knitting - much easier to remember which side is which since it is all together and very visible.  That being said, I had to re-write the pattern so that I would do the shaping at the right times.  With the raglan going on, some rounds had six different shapings happening at once.  That is a lot to keep track of.  I did the work on a 47" cable needle, which allowed me to try the sweater on as I went.  Very helpful to check fit that way.  Much harder to check that when the body of the sweater is in pieces.
Next work in progress is the kilt hose, they are taking forever to do.  Measured gauge over stockinette and it is coming up at 10 stitches to the inch.  No wonder it seems slow!  It is!
Here they are, pinned out flat so you can see both the front and back at the same time.  I decided that the bobbins just weren't working for me, so I am removing them as the yarn length gets under a yard or so.  I've read that many knitters just leave the long tails hanging and pick them up as they need them.  I'm finding that I like that process too.  These socks are pretty loud, but that is what the customer likes.  At the top edge where the two solid bands of ribbing are now, there will be a cabled band running around the sock right under the knee.  Flashes will be tucked under there to show the tartan and to keep the socks up - rather like garters, but around the calf of the leg up near the knee.

Until next time, I'm working on costuming for a Steampunk event...

Monday, March 28, 2011

A Tale of Two Yarns.... (K&C Blog Week - Day 1)

Ahhh, nothing like a challenge to get me rolling again!  My lone follower on this blog offered up a challenge to write this week about fiber addiction and specified the topics: see the full challenge here: http://yarnaddictconfessions.blogspot.com/ (and play along if you'd like!)

My love/hate relationship with acrylic yarn is one of the oddities of my wool-filled life.  I use it for things that I know will be used hard and knocked around some.  One of my favorites is this shrug that I did several years back in Caron Simply Soft Shadows - from the ball band pattern, modified with a deeper ribbing band.
Shrug in Caron Simply Soft Shadows

I wear this a lot since it goes with most things in my wardrobe.  One of the things I particularly like about it is in the general nature of shrugs - no front "ends" to get caught in things and it keeps my neck and shoulders warm.  The variegation of this yarn is what really enthuses me... I have a couple other colorways waiting for me in my stash - I know there is a fuschia and I think white as well.  I've also worked with the plain color Simply Soft and it is pretty nice stuff as well.  I use it when I'm doing a gift for someone who wants soft, but might not know how to care for wool.

Front view of shrug


Here's the front view:

Necklace by Chico's (another one of my favorite artsy stores)


Then there is the other side of the acrylic equation... the not so happy stuff.  Usually this involves chenille or boucle yarns.  I love the look, but the actual knitting is a different story.  With high hopes (and no sense, apparently) I charged into an afghan.  Double stranded with blocks of stockinette and garter stitch with a zigzag edge (also a ball band pattern).  Thought it would be an easy no-brainer kind of knitting.  That didn't turn out to be the case at all!  It tangles, snarls and basically misbehaves all the way through the process - although it does look pretty nice:
Afghan started with whopper ball of boucle


I've decided to frog the afghan and remake this yarn into a swingy, hip length jumper with a handkerchief hemline, the pattern is in Creative Knitting, March 2011 called "Sandy Shores".  I'm doing it from the top down so I can fit as I go, I want the bustline and the waistline to be at the proper spots.  If I have enough yarn, I might also add short sleeves.  This yarn is a stinker to work with double stranded on plastic circular needles.  I'll swatch it single on nickel circulars hoping that it will slide better.  I'm excited to see how the striping will look on the garment.

Now, on the yarn I really love: wool, marvelous and splendid, often imitated but never duplicated.  Fabulous fine or knockout chunky blends, I love my wool yarns!  Here's a shot of an alpaca blend done up into a big slouchy vest - worked up very fast from a Lion Brand pattern that I've lost track of.  This one appeals to my inner Viking.

Viking vest - front view
Ordinarily, I'm not a huge fan of the furry yarns, but I like this accent.  I used two different types, one a sparkle black and one a regular furry black.  Even though it is black, this vest has a cheery and fun feeling.  

This is the first piece I ever worked in bulky weight yarn.  The speed is nice, and it is a very pretty vest, but my taste runs more toward the fine and very fine yarns.  Cables and fussy bead knitting are personal favorites of mine, and yet, I don't have any of either one on the needles at the moment.  Need to finish up some other things first.

In the planning stages are a couple of things with cables (in wool yarn - of course!)  Carol Sunday's Tapestry cardigan and the Wicked vest from Classic Elite.  I think I'll do the cardigan in a Knit Picks yarn and the vest - hmmmmm, haven't decided on that yet, although I have a wool and silk blend that I just stashed that might be enough to do the job.  What a delightful quandry!


Viking vest - back view

As the week goes on I'll get to wander into territory that I haven't thought about in a long time.  You'll have to check the challenge if you want a sneak preview of the topics.  I'm still deciding what I want to write about...

Until next time, knitting, spinning and feeding the fish....


Thursday, March 10, 2011

Works in progress - Part One

Spinning aside for a while, I've got several knitting projects running now.  There is the Knit-a-long sweater that I started in October, the back is done:

Sweater back

The yarn is a lovely red-violet worsted weight.  Wool of the Andes from Knit Picks in a color called Fairy Tale.  I discovered that even though I like the looks of moss stitch, it is a pain in the rear to knit.  All that back and forth takes a long time, but it does give a nice edge - the small stripe below the armsceye is also 4 rows of moss stitch.  I'm rather fond of the color and the way the sweater is turning out.  I've only done one other sweater and that one was a gift.  Knitted it in the round and from the top down.  I really liked knitting that one.  But I figured that I should do a sweater from a pattern written the "normal" way, as a sort of experiment I suppose.

Then I started knitting the fronts (note to self - why did I let anyone talk me into knitting in pieces rather than in the round?) and finished those up a short while ago.  I'm pretty pleased with them as well... nothing is blocked yet, but I'll do that when I get all the pieces finished.  Here are the fronts:

Sweater front
This will be a raglan sweater - so the sleeves are next.  I'm knitting both of them at the same time on a circular needle with two balls of yarn.  It seems to be going faster that way than doing each one separately.  Also none of the "second of a pair" problem this way.  When these come off the needles, I can go straight to blocking and sewing up.  I think I'll choose buttons when I get the pieces assembled and before I do the bands and collar.  This sweater has a mandarin-type collar, but it doesn't join in the front.  Planning on going back to those wonderful yarn shops to find the perfect buttons - or maybe some of those neat Scandinavian clasps - I'm not sure which I'll like better on this one yet.

I'm knitting the sleeves during lunch at work and whenever I need mindless knitting to do.  I've got a lace cowl going at home that I can only work on when I know I won't be disturbed - pretty, but demanding enough that I don't want to find (and sort out) problem yarn overs in such fine yarn!  Back to work....